Tag Archives: Canon

Kodak Portra 400 Pushed To 800

I love London Pride and i’m sad to see that this year it has been cancelled due to COVID-19. This will be the first time since the first pride march in 1972 that there wont be a march. It’s very sad and feels like the right time to post this roll of film which I shot last year at London Pride 2019 and then a few frames after at the London Wetland Centre.


Tagged , , , , , , ,

Kodak Kodacolour 200

Hey there!

Below is a collection of photographs taken in Devon, 2019. To see how I developed the C-41 please check out the Lomography Colour 100 post.


Tagged , , , , , ,

Fuji Velvia 50 Cross Processed

Hey there!

In 2013 I bought 2 rolls of Fuji Velvia 50. I shot the first roll pretty quickly on a trip to New York City…to my surprise i’ve not uploaded that roll to the blog so at a later date will go back and rescan the negative for you all to see. Fast forward to 2020 and i’m shocked it took me 7 years to shoot the other roll (London Pride 2019)…I remember thinking it’s because Velvia is an E6 process. Which for the colour noobies out there E6 is a film processing technique using a different variation of chemicals and timings. The end results is a positive image instead of a negative image created with C-41.

E6 film is usually very fine grain, pin sharp image quality and vivid colours. However it doesn’t have the exposure latitude of C-41 colour negatives so your shots need to be perfectly exposed each time! For more information on the differences between E6 and C-41 check out this blog post from The Darkroom

As I don’t own E6 chemicals and wasn’t going to invest in any for 1 roll of film I decided to cross process with Tetenal C-41. Cross Processing is where you develop a roll of E6 > C-41 or C-41 with E6. For E6 > C-41 process you will usually get strong contrast and a lot of colour cast. For C-41 > E6 you’d normally see a flatter image with muted colours.

For my process I have a very prominent green colour cast.

Changing settings in Silverfast to compensate for Green Colour Cast.


You can see from the images below the highlights are blown out and the contrast is really high in places but overall i’m happy with the results!

Tagged , , , , , , , ,

Kodak Portra 400 Pushed to 1600

Last year I visited Chedder Gorge and Woolacombe in Devon. The weather was rainy & overcast….fantastic for diffusing light and creating soft shadows…an opportunity for me to push a roll of Portra to 1600. To follow steps on how to develop colour film check out my other post on Lomography Color Film

I’m very impressed with how this roll of Kodak Portra held up. I was expecting the shadows to be muddier but the contrasts and colours are looking great. The photos in Chedder Gorge on a rainy day work better than on a sunnier day in Woolacombe. On brighter days the contrast looses detail in the shadows.


Tagged , , , , , , , , , ,

KODAK ULTRAMAX 400 PUSHED TO 1600

Hey there!

Here is a collection of photographs from a visit to London Zoo, Devon and Trafalgar Square. To see the development recipe please check out my blog post Lomography 100 Color which uses the same Tetenal C-41 Developer

Tagged , , , , , , , , , , ,

Dubblefilm Moonstruck 200

Canon EOS 620. F/8. 1/250. 40mm.

This collection of photographs is from a trip to Devon in the summer. Dubblefilm partially expose kodak stock of film with a blue hue. The film was exceptionally dusty – i’ve didn’t have this with other rolls I developed in the same tank or dried at the same time so I am assuming it’s from where the film is partially exposed and then wound back in to the cassette.

Nothing some cleaning can’t fix and the end results are interesting.

Tagged , , , ,

Portra 400 Reciprocity Failure

Normal Reciprocity

Normal reciprocity is when your camera settings are balanced to allow light entering the lens to hit the light sensitive film evenly thus creating an image that is correctly exposed with no muddy shadows, high grain or blown out highlights – if you’re using colour film this will include no colour shift or colour cast.

So exposure settings of 1/60 at f/11 will give the same amount of light as 1/125 at f/8 as 1/250 at f/5.6. Remember to take in to consideration changing your aperture will affect depth of field and sharpness so if you are shooting at f/16 you’ll need to compensate using your shutter speed alone but hopefully from this example you’ll understand…

What is Reciprocity Failure?

Reciprocity Failure is when your camera settings aren’t balanced which results in an incorrect amount of light hitting the light sensitive film for an incorrect duration of time. So If you’re unable to adjust your camera settings to compensate this will cause reciprocity failure. Failure can also occur when an ND filter is used and the incorrect meter reading / exposure settings are set.

The cut off point for each film type varies but there’s a reciprocity failure point for all film types – for black and white film this results in less dense images with increased grain, muddy shadows and blown out highlights. To compensate for this you will need to extend the exposure time and pull the processing time so highlights aren’t blown out but detail is retained in the shadows. Colour film requires similar time and processing adjustments to B&W but with the added bonus of colour shift. This can be corrected during post by adding more saturation and colour adjustments.

Interestingly reciprocity failure doesn’t occur in digital cameras – this is because light hits the sensor and is recorded in the camera whereas light can scatter and bleed into other layers on sensitive film. However a side effect of long exposures using digital is increased noise.

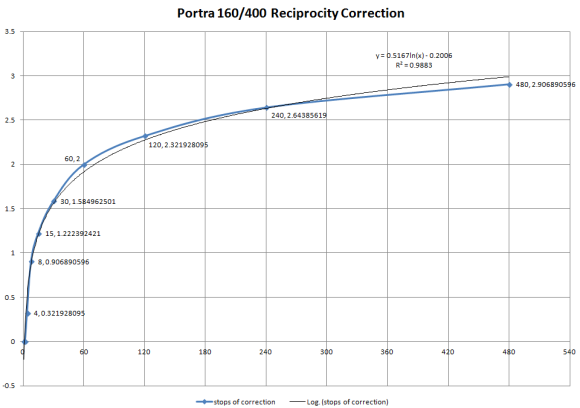
There are plenty of people who’ve taken the time to study different film stocks over the years and measure reciprocity. I used this graph by Isaac Sachs to reference Kodak Portra 160 & 400 to calculate how much time I would need to extend my exposures.

For Portra 400 reciprocity failure starts around 4s which would result in a 0.5x increase in exposure time. For those who want to see some results of over and under exposing Portra watch this video by Kyle McDougall.

The Shoot

This was a simple test shoot of 10 frames just to give me a baseline for future experimentation and to see what mistakes I make now so I can make informed decisions on a future project.

Firstly I should’ve shot a lot more, like the entire roll more! Secondly the changes in colour shift aren’t nearly as dramatic as I was expecting. Frame 6 (bus stop) is too bright from what I wanted. I love that the shady bushes behind have retained detail but the moodiness and amber light that was cast over the road has been lost. I could fix this in post – but showing accurate test results is what i’m presenting here – not a prize winning photo. Thirdly I should’ve experimented with longer exposures (20, 30s + etc) in darker areas using a cable release to really stretch the film and experiment with the same subject using different settings to set a baseline for reference.

Metering was taken using the camera internal ETTL as well as a Light Meter app. I used Tetenal C41 developer using the standard development time of 3m 15s at 38ºc. I did not pull the process. Full Tetenal development details can be found here

Frame 1

Frame 2

Frame 3

Frame 4 – feels too bright and saturated compared to the rest of the test

Frame 5 – I actually like the tones in this shot. Muted yet amber of the lighting nearby. Could do with a punch of saturation.

Frame 6 – getting washed out. Good shadow detail but lost amber glow and ambience of the environment. Too bright

Frame 7 – shifting towards yellow

Frame 8 – deeper reds

Frame 9 – more red tones

Frame 10 – shifting towards green


Have I missed anything out?

If you think I have missed something out or not give the correct credits please let me know on Twitter or the comments box below.

Resources

What is Reciprocity Failure?

Long Exposure Film Tests

Reciprocity Graph Portra 400

Ilford Low Intensity Reciprocity Failure

I Still Shoot Film Reciprocity Failure

Geoff Lawrence Reciprocity Failure

Tagged , , , , ,

Kodak Portra 400

Brad sitting at the Wetland Centre. Photo credit: James Wakelin

A Fresh Start

The first roll of colour film I developed at home for this blog was Lomography Colour 100 with Tetenal C-41. The results were pretty good and I wondered why friends in the photography community always claimed colour was more tricky…I agree one must be very precise with water temperature during processing but as long as you set up a good workflow you minimise risk of problems.

At the beginning a rookie mistake I made was storing chemicals in glass bottles on the top shelf of my wardrobe instead of plastic bottles on the bottom shelf. Unfortunately the shelf gave out from the weight which smashed everything on the floor…whoops! More about that can be read here.

Another mistake I made was not knowing colour chemicals do not stay fresh for very long once mixed (6 weeks), the concentrate gives you 12 weeks though, added to the 6 weeks after mixing is another 24 weeks. I tried mixing another 1000ml after the end use date and the bleach fix turned into a yellow lumpy cheese like goop. Not good.

Tetenal can process around 30-40 rolls of film so these two mistakes are an expensive lesson to learn. At the time I didn’t have the money or free time to invest in 40 rolls of film to shoot – I was looking for a new job and had a lot of changes happening in life.

I regularly wrap paper around my film telling me what is on the roll for a later date when i process.

Fast forward to Autumn 2019 and in 3 months i’ve shot 20 rolls of film to develop and will be ordering some more for a short trip away in October – so fingers crossed I should hit that 30-40 number making things way more cost efficient.

Mixing Tetenal C41 developer.

How I develop

Follow the instructions in the Tetenal guide – they’re fool proof and super easy! Each time I develop a roll of film I tally up the guide to track the life of each mix. The development and bleach times are extended depending on how many rolls you have developed or if you are push processing.

Everyones workflow will vary but i’ve found that if I fill a bowl with water to around 50ºc the heat transfer warms up the chemicals with enough time during cooling to 38ºc to load the film to the spools & development tank. Once the bowl temperature reaches 39ºc I start a 5 minute film bath at 38ºc (water taken straight from tap and temp measured using thermometer). By the time I have finished preheating the film the temperature in the bowl and my chemicals are 38ºc exactly.

I always put the development tank in to the bowl to keep the temperature up and I regularly check with a thermometer! If it starts dropping below 38ºc I top up the warm bath with hot water to a couple of degrees higher to keep the chemicals at 38ºc.

Scanning:

Once the negatives have dried they are cut in to a strips of 6 frames and placed in an archival box. I use industry standard archiving from when I was working as a retoucher – date backwards, followed by job number, then by product, and client or location. Underscores are used instead of spacing. So the latest project is always at the bottom of the list. For example the roll of film for this blog post is 19090601_KODAK_PORTRA_400_LONDON_WETLAND_CENTRE

The job number goes up depending on how many jobs I have that day. This is handy if i’m with the same client but on a different shoot or location or batch. I.e 19060101_PORTRA, 19060102_PORTRA, 19060103_PORTRA, etc etc etc

I scan my negatives flat without adjustments or sharpening using a Plustek Opticfilm 8100 at 3600 dpi which produces a 50mb file at 3300 x 4968. The scanner can do up to 7200dpi however the scan time is too slow and I don’t require that much data for web use. If I ever print the images I would rescan at 7200dpi and reprocess for print. The images are saved as PSD’s which increases their compatibility with Lightroom and Photoshop. Lightroom is my main tool for global adjustments such as colour, cropping and batch processing. Macro adjustments and cleaning are done in Photoshop.

London Wetland Centre

This roll of Kodak Portra 400 has been processed with warmer tone that I feel reflects the warmth of the summer day I shot it on.

Limehouse to Camden Canal Walk

Lewisham twilight

These photographs are some test shots I took for a future post about Reciprocity Failure.

Tagged , , , , , , ,

Found Archive: Fuji Super G 200

The photographs in this collection are from the first day we bought a puppy in 1996. In these photographs we have my mother, two sisters and our puppy Bonnie.

Tagged , , , , , , , ,

Lomography 100 Color Print Film

Prelude to colour:

Since starting The 35mm Project in 2013 I have sent all my colour film to labs, but over the last eight months I have had some great results with black and white since taking the time to really understand the development process and what I want from film. My negatives have never looked better and with every process, push, pull or out of the box I am learning. Now, I want to explore colour processing to hone my skills further, to save money and to see (if any) what difference in quality there is between my negatives and the labs I once used. I am interested in good results and bad results, colour shift, colour cast, what mistakes I make and what affect it has on the photograph, will it change the image for better, or worse? Lets explore!!!

Step 1: Receiving the goodies!

Contents of photograph: Tetenal C-41 kit, 3 x 1 litre brown chemical storage, 2 x 1000ml jugs, 2 x 600ml beakers, 1 x 150ml beaker, Ilford stop bath, Ilford rapid fixer, Rodinol R09, Hama Negative Storage, 2 x Patterson negative clips, scissors, cleaning equipment, syringes, development tank, 2 x spools, negative cleaning alcohol, thermometer, chamois, microfibre cloth, agitator, eyepiece. All equipment purchased from Silverprint.

Most of the items in the photograph above I already had but today (05/06/18) I received a pack of Tetenal C-41 Developing Kit. YAZOOOO!

Step 2: Setting up

Setting up the gear was easy! I followed a similar process to YouTuber Wild We Roam and also referred to YouTuber The Art of Photography. I would check both these guys out, their process is simple to follow and informative.

I labelled the bottles with steps so the chemicals aren’t mixed and it’s easier for me when concentrating on temperatures and timing. It’s important to keep the chemicals away from one another, especially bleach to developer as the bleach will neutralise the developer and stop it from working. A 2.5L pack of Tetenal will develop around 30-40 rolls of film and last around 6 months from the date of being opened. I will process 14 rolls per 1/L of solution and 7 rolls in the final 500ml solution over the next few months.

Labels stuck on to the side of jar. Printed.


Highlighted 1L mix


Small chart in Tetenal instructions to keep track of the mix and films used with it. Development times increase after every 4th film used at 1L mixture ratio.

I mixed the chemicals following the guidelines in the Tetenal instruction booklet. The temperature requires great accuracy with a maximum deviancy of +-.05ºc for development. +-1ºc for the bleach fix and between 30-40 degrees for Stab & Rinse. Unfortunately just before starting the development process I realised my thermometer doesn’t go above 30ºc! The Tetenal instructions do have a development process at a lower temp (usual being 38ºc) however there may be some colour shift.

Eager to try the kit out and unable to wait for a thermometer with a larger range I decided to develop 1 of the 3 rolls of Lomography 100 I have shot at the lower 30ºc temperature to see how the development is affected compared to 38ºc. I used a bucket filled with water with a temp of around 33ºc (slight guess as there was no markings past 30ºc on the thermometer) to keep the chemicals warm. While the chemicals were warming I turned the lights out and loaded the film on to a spool.

Step 3: Develop

Stage 1 of development is a warm water bath for the negative for five minutes, during this time I kept checking the developer temp to ensure if stayed at 30ºc. The development times are pre-set by Tetenal however the agitation times are my own:

Water bath & pre heat developer tank 30ºc for 05:00m
Developer 30ºc for 08:00m (agitate for 15s every minute)
Bleach Fix 30ºc for 06:00m (agitate for 15s every minute)
Rinse around 33ºc for 06:00 (acceptable range of 30ºc – 40ºc change water every 30s)
Stabilizer 30ºc for 01:00m (acceptable range of 20ºc – 40ºc)

Processing in the bath.

Step 4: The moment of truth….

Step 5: Scan, Clean, Upload

There aren’t any predefined settings on Silverfast for Lomo 100 but I found the Fuji Superia 100 settings to work the best for this type of film. Images were scanned using a Plustek Opticfilm 8200i 35mm scanner with Silverfast 8. Scanned as PSD and imported to Lightroom & Photoshop. Images were spot, dust and scratch removal at 100%. Cropped to 6×4 ratio. No sharpening. I wanted to retain as much of the original negative colour and sharpness (otherwise, what is the point?).

Camden Market f/2.8 Canon EOS 620

It is times like this when I see a negative that I have developed myself and think “why did I not do this from the beginning?”. Honestly! Everyone should develop their own film, the results are far superior than that of any lab I have ever sent film to. The negative is well developed, colours are consistent and it was extremely fun!

London f/4 Canon EOS 620

Have a look at the gallery below to see more.

Tagged , , , , , , ,