Brad sitting at the Wetland Centre. Photo credit: James Wakelin
A Fresh Start
The first roll of colour film I developed at home for this blog was Lomography Colour 100 with Tetenal C-41. The results were pretty good and I wondered why friends in the photography community always claimed colour was more tricky…I agree one must be very precise with water temperature during processing but as long as you set up a good workflow you minimise risk of problems.
At the beginning a rookie mistake I made was storing chemicals in glass bottles on the top shelf of my wardrobe instead of plastic bottles on the bottom shelf. Unfortunately the shelf gave out from the weight which smashed everything on the floor…whoops! More about that can be read here.
Another mistake I made was not knowing colour chemicals do not stay fresh for very long once mixed (6 weeks), the concentrate gives you 12 weeks though, added to the 6 weeks after mixing is another 24 weeks. I tried mixing another 1000ml after the end use date and the bleach fix turned into a yellow lumpy cheese like goop. Not good.
Tetenal can process around 30-40 rolls of film so these two mistakes are an expensive lesson to learn. At the time I didn’t have the money or free time to invest in 40 rolls of film to shoot – I was looking for a new job and had a lot of changes happening in life.

I regularly wrap paper around my film telling me what is on the roll for a later date when i process.
Fast forward to Autumn 2019 and in 3 months i’ve shot 20 rolls of film to develop and will be ordering some more for a short trip away in October – so fingers crossed I should hit that 30-40 number making things way more cost efficient.

Mixing Tetenal C41 developer.
How I develop
Follow the instructions in the Tetenal guide – they’re fool proof and super easy! Each time I develop a roll of film I tally up the guide to track the life of each mix. The development and bleach times are extended depending on how many rolls you have developed or if you are push processing.

Everyones workflow will vary but i’ve found that if I fill a bowl with water to around 50ºc the heat transfer warms up the chemicals with enough time during cooling to 38ºc to load the film to the spools & development tank. Once the bowl temperature reaches 39ºc I start a 5 minute film bath at 38ºc (water taken straight from tap and temp measured using thermometer). By the time I have finished preheating the film the temperature in the bowl and my chemicals are 38ºc exactly.
I always put the development tank in to the bowl to keep the temperature up and I regularly check with a thermometer! If it starts dropping below 38ºc I top up the warm bath with hot water to a couple of degrees higher to keep the chemicals at 38ºc.

Scanning:
Once the negatives have dried they are cut in to a strips of 6 frames and placed in an archival box. I use industry standard archiving from when I was working as a retoucher – date backwards, followed by job number, then by product, and client or location. Underscores are used instead of spacing. So the latest project is always at the bottom of the list. For example the roll of film for this blog post is 19090601_KODAK_PORTRA_400_LONDON_WETLAND_CENTRE
The job number goes up depending on how many jobs I have that day. This is handy if i’m with the same client but on a different shoot or location or batch. I.e 19060101_PORTRA, 19060102_PORTRA, 19060103_PORTRA, etc etc etc
I scan my negatives flat without adjustments or sharpening using a Plustek Opticfilm 8100 at 3600 dpi which produces a 50mb file at 3300 x 4968. The scanner can do up to 7200dpi however the scan time is too slow and I don’t require that much data for web use. If I ever print the images I would rescan at 7200dpi and reprocess for print. The images are saved as PSD’s which increases their compatibility with Lightroom and Photoshop. Lightroom is my main tool for global adjustments such as colour, cropping and batch processing. Macro adjustments and cleaning are done in Photoshop.
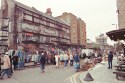
London Wetland Centre
This roll of Kodak Portra 400 has been processed with warmer tone that I feel reflects the warmth of the summer day I shot it on.
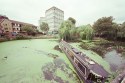
Limehouse to Camden Canal Walk
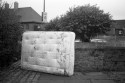
Lewisham twilight
These photographs are some test shots I took for a future post about Reciprocity Failure.